What Is It?
An AI agent is a digital assistant that you set up for a specific job. When you create one, you decide its name, which AI model it runs on, and what its role is. For example, you could set one up as a virtual assistant that handles all of your agency's emails.
Agents live in the Digital Workforce, which you reach from the left sidebar under Workspaces, then Management Center. The page is split into two sections. Default Agents are the ones that already come with InsuranceAgency.ai: Account Manager Agent, Customer Service Agent, Office Manager Agent, Rate Quoting Agent, Sales Agent, Service Request Agent, Accounting Agent, and Billing Agent. My Agents is where the agents you create yourself show up, labeled Custom.
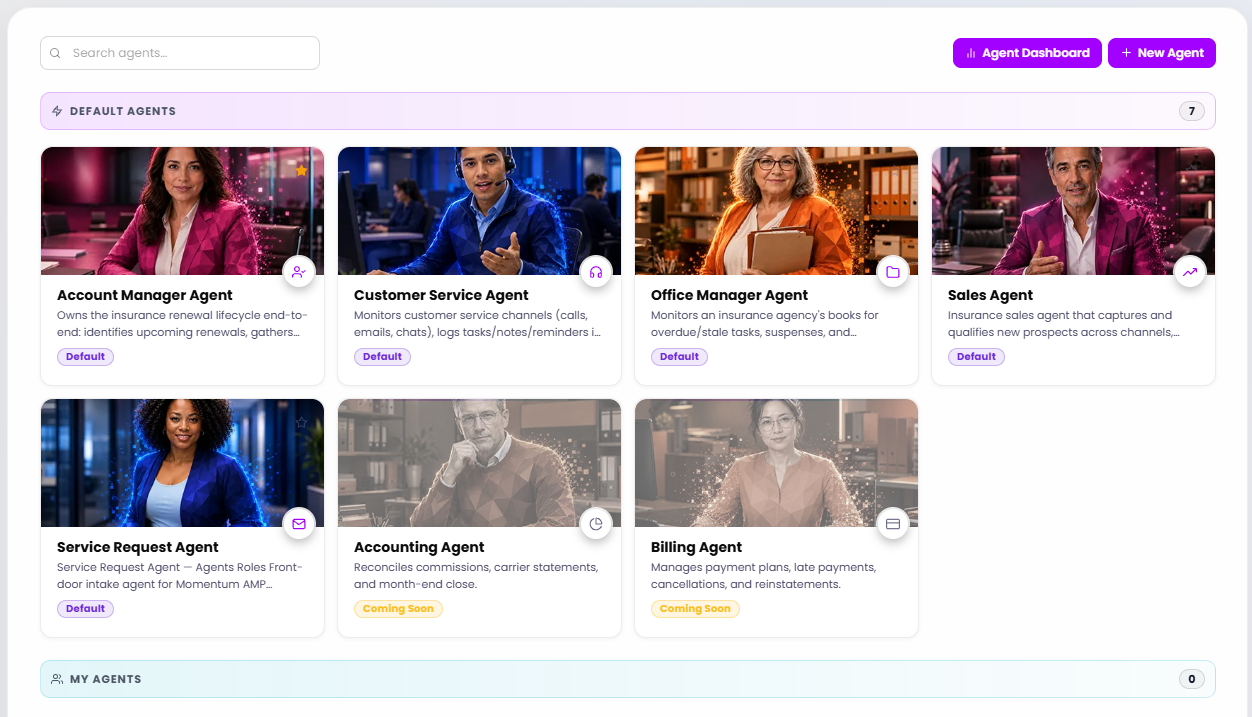
The Digital Workforce: Default Agents at the top, and My Agents below.
How This Saves You Time
You describe the agent's role in plain words, so anyone in your agency can set one up without technical knowledge. The description can be as long as you want.
Tools connect on their own. Right after you create the agent, its tools are connected to your agency's MCP tools, so there is nothing to set up by hand.
Skills are created by describing them. You name the skill and describe what it should do.
Memory works the same way. Anything you want the agent to remember, you simply describe in the Memory tab.
You build the agent once and share it. A link lets the other agents in your agency replicate it in their own accounts, or you can install it for the whole agency at once, so nobody on your team has to start from zero.
Choosing a lighter model for simple tasks spends fewer tokens on each message or prompt.
Why This Matters
Every agency handles work a bit differently. Creating your own agent lets you build an assistant around how your agency actually works, such as one that handles your emails, instead of settling for a generic setup.
And since agents can be shared, one person's good setup can become your whole agency's starting point.
How It Works, Step by Step
Step 1: Open Digital Workforce and click New Agent
In the left sidebar, open Workspaces, then Management Center, then Digital Workforce. At the top right of the page you'll see two buttons: Agent Dashboard and New Agent. Click New Agent to start creating your agent.

The New Agent button, at the top right of the Digital Workforce page.
Step 2: Give it a name
A form opens with the heading New Agent. The first thing to fill in is the name. You can call the agent whatever you like.

The Name field.
Take a look at the tabs at the top of the form. Activity, skills.md, and Tools are greyed out at this point. They unlock once the agent is created, which happens in Step 6.

The tabs while the agent is still being created.
Step 3: Choose the model
Open the Model dropdown. This field is required, and it's an important choice: some models spend more tokens than others, because they need to think through the right answer.
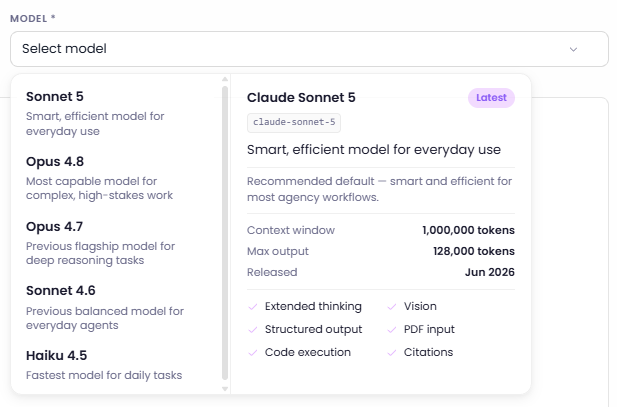
The model list, with the details panel for Sonnet 5 on the right.
The list shows five options:
Sonnet 5: a smart, efficient model for everyday use. It's marked as the recommended default for most agency workflows.
Opus 4.8: the most capable model, for complex, high-stakes work.
Opus 4.7: the previous flagship model, for deep reasoning tasks.
Sonnet 4.6: the previous balanced model, for everyday agents.
Haiku 4.5: the fastest model, for daily tasks.
Pointing at a model opens a details panel. For Sonnet 5, it shows a context window of 1,000,000 tokens, a maximum output of 128,000 tokens, a June 2026 release date, and the features it supports: extended thinking, vision, structured output, PDF input, code execution, and citations.
The recommendation is to select the best model available, which right now is Sonnet 5. You can also use Opus or Haiku, for example for quick or simple tasks. By going down to a lighter model, you spend fewer tokens on each message or prompt.
Step 4: Describe the agent's role
The Description field is informational. It's for you, or for anyone else looking at this agent, to understand what its role is. Write what the agent is for. For example: You're a virtual assistant that handles all my emails. You can add as much as you want.

Name, model (Sonnet 5), and description filled in.
Step 5: Add handoff instructions in agents.md
Next, click the agents.md tab. This is where you instruct the agent for the times when it needs help, or when it needs to transfer a task to one of the other AI agents. In other words, it's the place to tell it how to hand those tasks off.
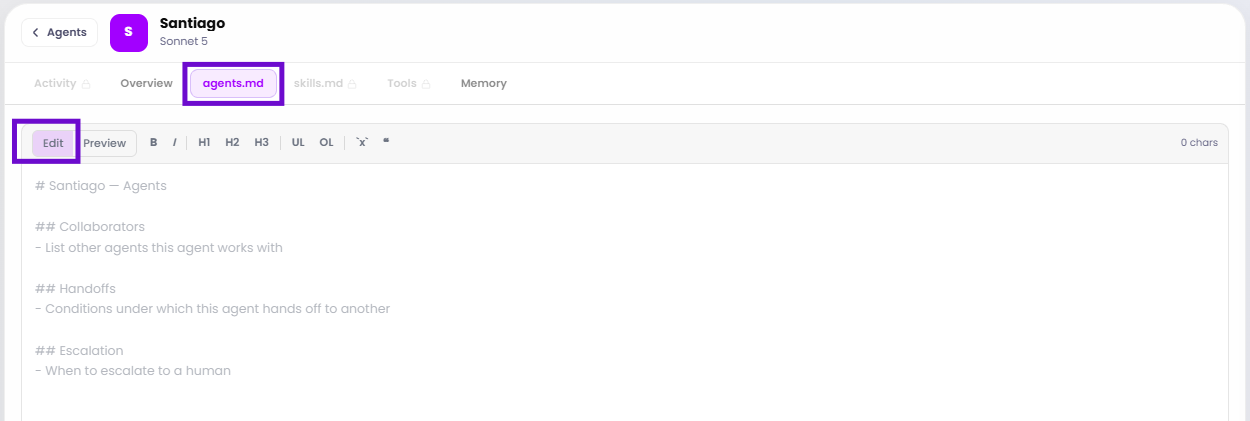
The agents.md editor, with its starter sections.
The editor opens with a starter template made of three headings. Collaborators is where you list the other agents this agent works with. Handoffs is for the conditions under which this agent hands off to another. Escalation is for when to escalate to a human. The editor has Edit and Preview modes, plus buttons for bold, italics, headings, and lists.
Step 6: Click Create Agent
Once the model is selected, the Create Agent button, at the bottom right of the form, becomes available. Click it. When the agent is created, you'll have it available in your Digital Workforce.

Create Agent.
This is an important point: only after you hit Create Agent can you start instructing the agent, which means adding skills, tools, and memory. Once it's created, the agent's page shows all of its tabs: Activity, Overview, agents.md, skills.md, Tools, and Memory. The buttons Start Chat, Set as Primary, and Share also appear at the top right.

The agent after it's created, with all of its tabs available.
Step 7: Add skills
Open the skills.md tab. This is where you add the right skills for the job you want this agent to do. You can create your own customized skill: click Create New Skill, give the skill a name, and describe what the skill should do.
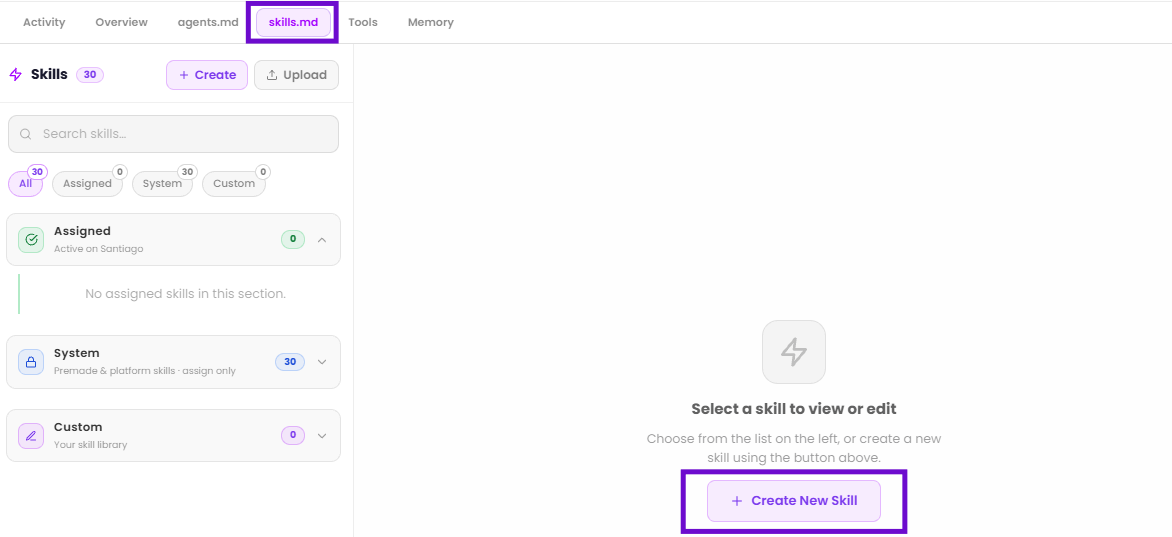
The Skills panel, with the Create New Skill button.
The panel is organized into three groups. Assigned shows the skills that are active on this agent, and it starts empty. System holds the premade platform skills, which you can only assign. Custom is your own skill library. A search box and filters (All, Assigned, System, and Custom) help you find what you need, and there are Create and Upload buttons at the top.
Step 8: Check the tools
You don't have to set up the agent's tools. Immediately after you create the agent, its tools are connected to your MCP tools, so you don't have to worry about it. If you want to take a look, open the Tools tab.
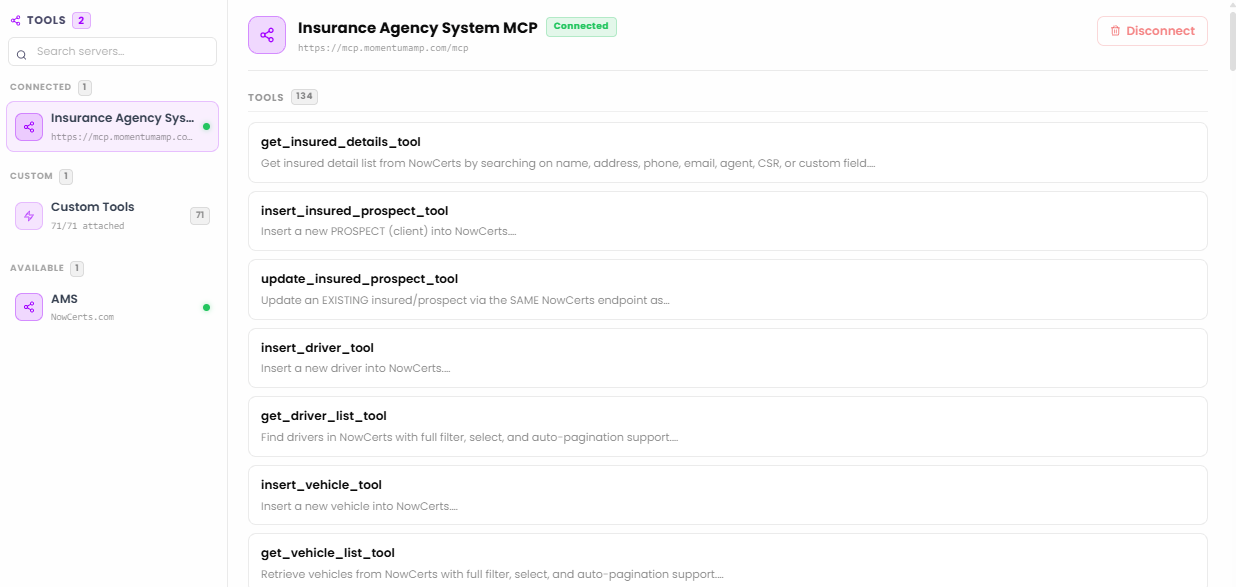
The Tools tab, showing AMS MCP as connected.
On the left, tools are grouped into Connected (here, AMS MCP), Custom (Custom Tools), and Available, which lists other servers you could use, including Rate servers for personal auto and home-owner. On the right, the connected server shows its list of tools. AMS MCP lists its full set of tools, with names such as get_insured_details_tool, insert_insured_prospect_tool, and get_driver_list_tool, each with a one-line description. A Disconnect button sits at the top right of the connected server.
Step 9: Add to its memory
If you need to add something to the agent's memory, open the Memory tab and start describing it there.
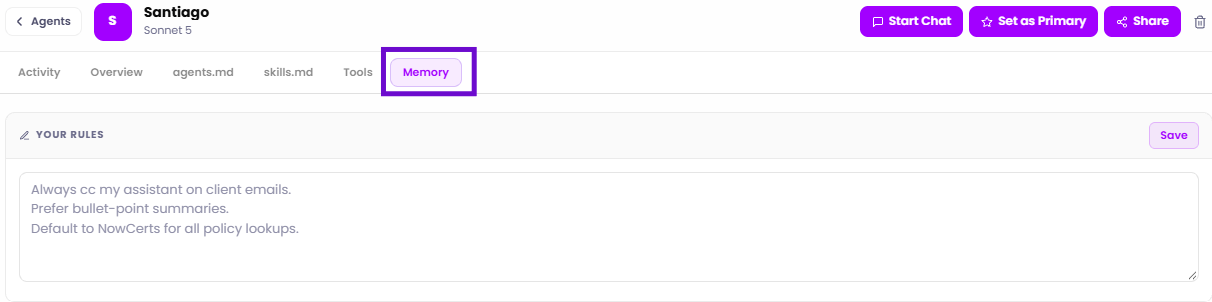
The Memory tab, with Your Rules and Learned Rules.
The tab has two parts. Your Rules is a text box where you write rules in your own words. The box shows examples of what you can write, such as: Always cc my assistant on client emails. Prefer bullet-point summaries. Default to NowCerts for all policy lookups. Click Save to keep what you wrote. Learned Rules sits below and starts empty, with the message Nothing learned yet, click refresh to generate.
Step 10: Share your agent
There's one more thing you can do with your agent: share it. Click the Share button at the top right of the agent, and a window opens with two options.
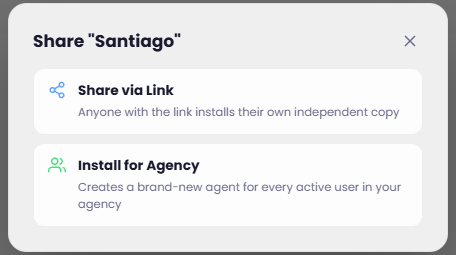
The two sharing options: Share via Link and Install for Agency.
Share via Link: you send the link to any of the agents in your agency, and they can replicate your agent in their own account. The window describes it this way: anyone with the link installs their own independent copy.
Install for Agency: this creates the agent you just built for all users in the agency. The window describes it as creating a brand-new agent for every active user in your agency.
Conclusion
Creating your first agent comes down to a few choices: a name, a model, and a role, plus instructions in agents.md for handing tasks off to other agents. Picking the model is also a choice about tokens, since lighter models spend fewer of them on each message.
Once you click Create Agent, you can start instructing it. Skills define what it can do, tools are already connected to your agency's MCP tools, and memory holds the rules you want it to follow. When it's ready, you can share it with a link or install it for the whole agency, so everyone in your agency starts from the same setup.
Questions? Reach out to your Momentum AMP product contact with anything about InsuranceAgency.ai.
This article reflects the agent creation workflow as of this writing.
Was this article helpful?
That’s Great!
Thank you for your feedback
Sorry! We couldn't be helpful
Thank you for your feedback
Feedback sent
We appreciate your effort and will try to fix the article