An AI agent can read a document, such as a declaration page, and enter the information in your AMS for you. Nobody has to type it in field by field.
What Is It?
With one of InsuranceAgency.ai's AI agents, you can save a lot of time entering information in your AMS. For example, when you receive a declaration page for a policy, you don't have to go and enter it detail by detail, field by field. You can have an AI agent do that for you.
You start a conversation with the agent and attach the file. Then you tell it, in a prompt, what you want: to scan and analyze the file, and, based on that, to create a new record in your AMS, or a new prospect. The agent scans the file, enters all the information in the AMS, and creates a new record for it.
How This Saves You Time
You don't enter the information by hand, detail by detail, field by field. An AI agent does it.
The agent creates the new insured in your system and even adds the policy to the record, so none of it has to be done manually.
It summarizes all the changes it made, so you can see exactly what it did.
It links you straight to the exact record in the AMS, so you can check it in one click.
It can enter more than the basics. In this example, it also created the additional interests.
It can offer the next step, such as generating an ACORD 25 certificate, with a simple yes or no.
Why This Matters
Entering a new policy in the AMS means typing a lot of details, field by field. Letting an AI agent do it saves a lot of time, and the information ends up in the right fields of your AMS.
And you can always open the record afterward and check it.
How It Works, Step by Step
Step 1: Open a chat with an AI agent
Start a new chat with an AI agent. In this example, it's the Service Request Agent. The page says that messages go straight to that agent, and that you can start something new or pick up a recent chat.

A chat with the Service Request Agent.
Step 2: Attach the file
Use the paperclip, next to the message box, to attach the file you want the agent to scan and analyze. In this example, it's a declaration page for a policy.

The message box, with the paperclip to attach a file.
Step 3: Write your prompt
Now tell the agent what you want it to do. It's a matter of prompting it. In this example, the prompt is: Scan the file and enter all the information on the AMS, create a new record for it. The attached file shows above the message box. Then hit send.

The attached file and the prompt, ready to send.
Step 4: Let the agent work
After you hit send, you'll see the AI agent working on it. The agent scans the file, enters the information in the AMS, and creates the new record.
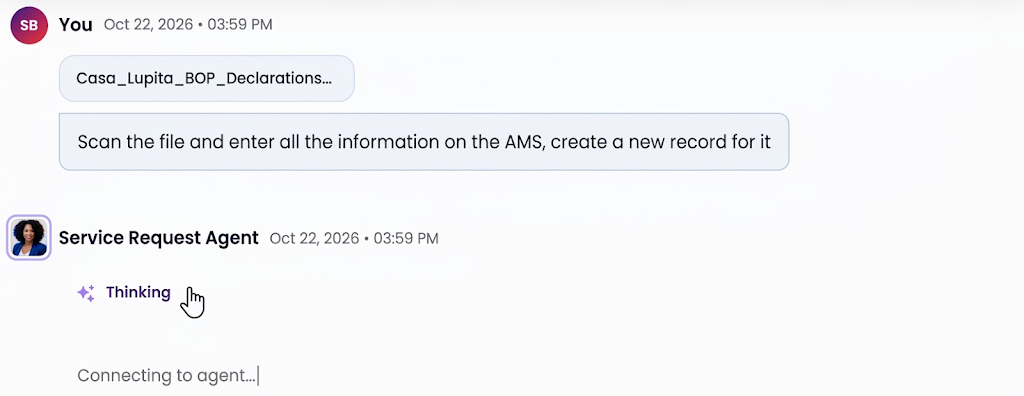
The agent starts working on the request.
Step 5: Review what it created
When it's done, the agent tells you that it created the new record. In this example, it created the new insured in the system, and it even added the policy to the record. The result lists the insured details and the policy details, such as the policy number, the carrier, the form, the term, and the premium.
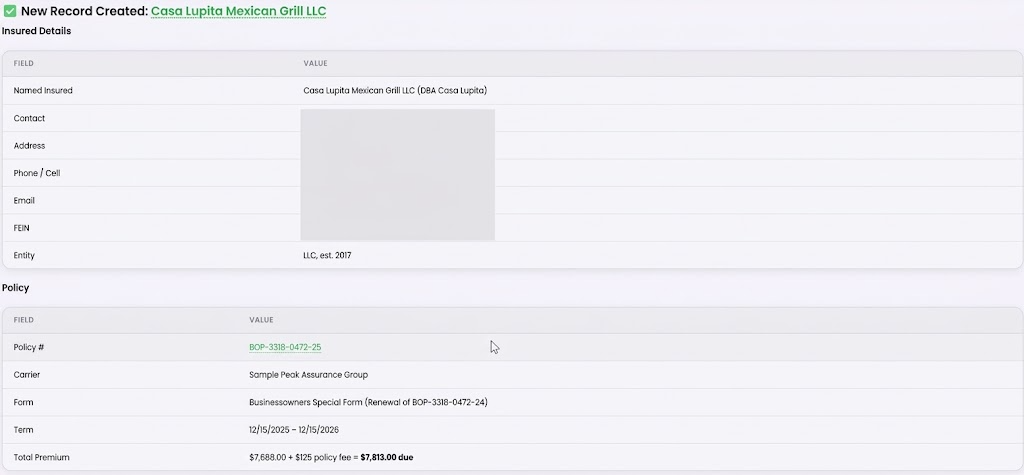
The new record created, with the insured and policy details. Contact details are hidden here on purpose.
Step 6: See everything else it did
The agent also summarizes all the changes. Below the main details, it lists what else it entered. In this example, that includes the property location and coverage schedule, the liability coverages, rating data, prior claims, two additional interests, and a summary note attached to the insured and policy.
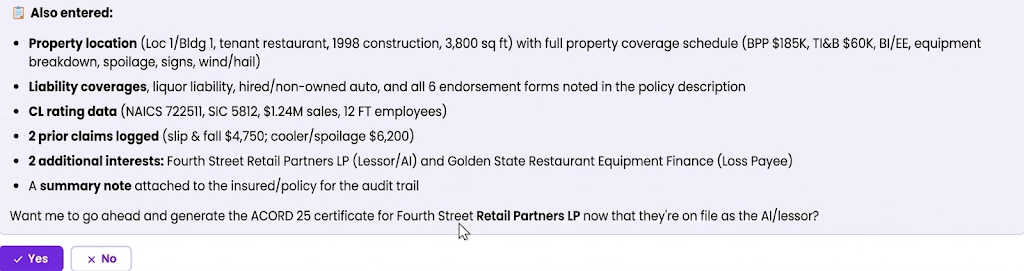
What else the agent entered, and the next step it offers.
The agent is also asking if you want it to generate an ACORD 25 certificate. You can hit Yes or No, and it will do it.
If you click on the insured, a panel opens with a summary of the record that was created. You'll see that the policies are active for that insured, and you'll find the notes, where you can see what the agent just did.
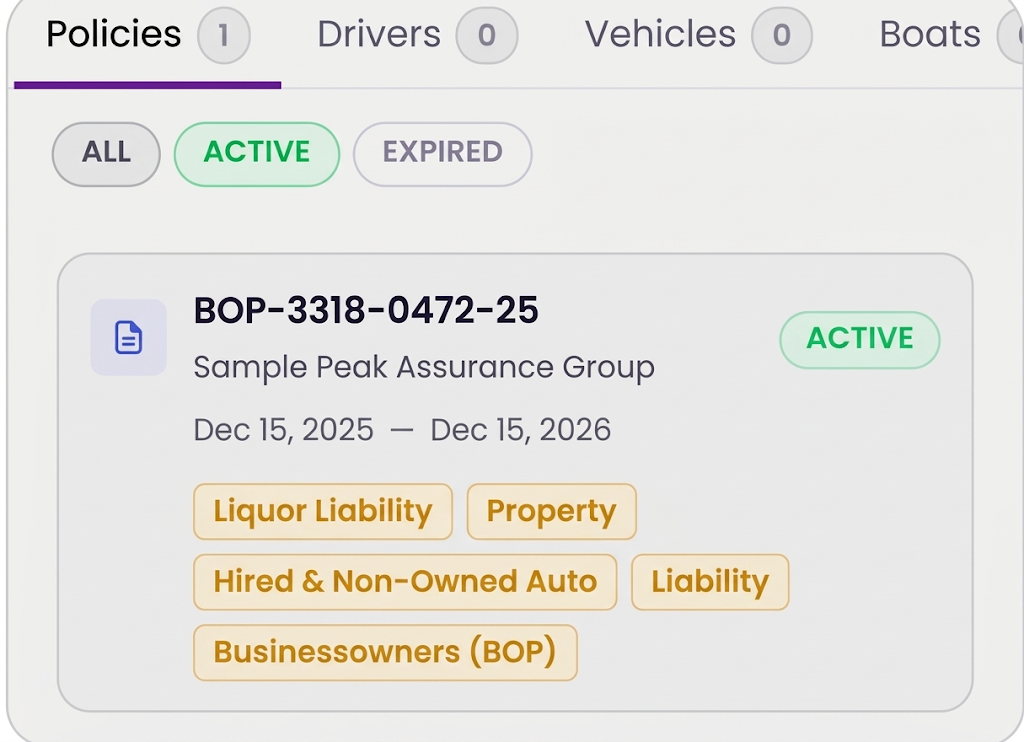
The summary panel, with the insured's active policy.
Step 7: Open the record in the AMS
Let's find it in the AMS. Click the insured's name in the agent's message, and you'll have a hyperlink. It takes you to the exact record, to the exact insured.

The hyperlink to the record.
There, you'll see that the insured was entered in the system. It's a commercial insured, and it has the policy. The record shows the policy in the policies list, with its dates, lines of business, status, carrier, and premium.

The insured in the AMS, with its tabs. Contact details are hidden.

The policy in the policies list.
Step 8: Check the policy
If you go into the policy, you'll see all the information available right there. Everything that was included is in there. The more information you give the AI, the more it will be able to go and find the right fields to put it in.
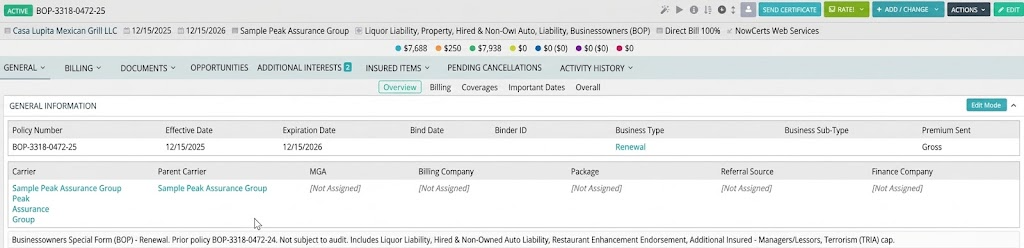
The policy, with its information entered.
Step 9: Check the additional interests
Everything exists in the record, even the additional interests. The agent created the additional interests that were needed, and they're assigned to the policy.

The additional interests the agent created.
Conclusion
Instead of entering a new policy field by field, you attach the document, tell an AI agent what you want, and let it create the insured, the policy, and even the additional interests in your AMS. Then you open the record and check it.
It's really powerful, and it really saves time, because nobody has to come in and type everything. It's all made by AI.
Questions? Reach out to your Momentum AMP product contact with anything about InsuranceAgency.ai
Was this article helpful?
That’s Great!
Thank you for your feedback
Sorry! We couldn't be helpful
Thank you for your feedback
Feedback sent
We appreciate your effort and will try to fix the article