RabbitSign is an integrated e-signature tool in Momentum AMS that allows agencies to send documents for client or carrier signatures directly from the Documents tab. Once a document is sent, users can view its progress, send reminders, or download completed signed copies — all within the insured’s record.
When to Use This
Use RabbitSign when you need to:
Obtain client, agent, or carrier signatures electronically.
Send any PDF document (ACORD forms, proposals, applications, etc.) for signature.
Track signature progress and manage completed documents directly within Momentum AMS.
⚠️ If RabbitSign has not yet been connected to your agency account, please follow the setup instructions in our RabbitSign Setup Guide before continuing.
Step-by-Step: Sending a Document for Signature
Step 1: Open the Insured Record
Go to Insureds from the left navigation menu.
Search for and open the insured’s profile.
Select the Documents tab.
Step 2: Select or Upload the Document
Choose an existing document from Forms or add a new one.
Once the document appears, click the Actions dropdown and select Send.
Step 3: Open the Send Email Window
In the Send Email dialog box:
Confirm the From address.
Enter the recipient’s email in the To field.
Add a Subject and optional message.
Select any additional delivery methods (CC, BCC, SMS, etc.).

Step 4: Enable RabbitSign
Check the box labeled Rabbit Sign (bottom right of the e-signature options).
Once selected, RabbitSign will display Assign Fields

Only one e-signature option can be active per send — Formstack Sign, WeSignature, or RabbitSign.
Step 5: Assign Signature Fields
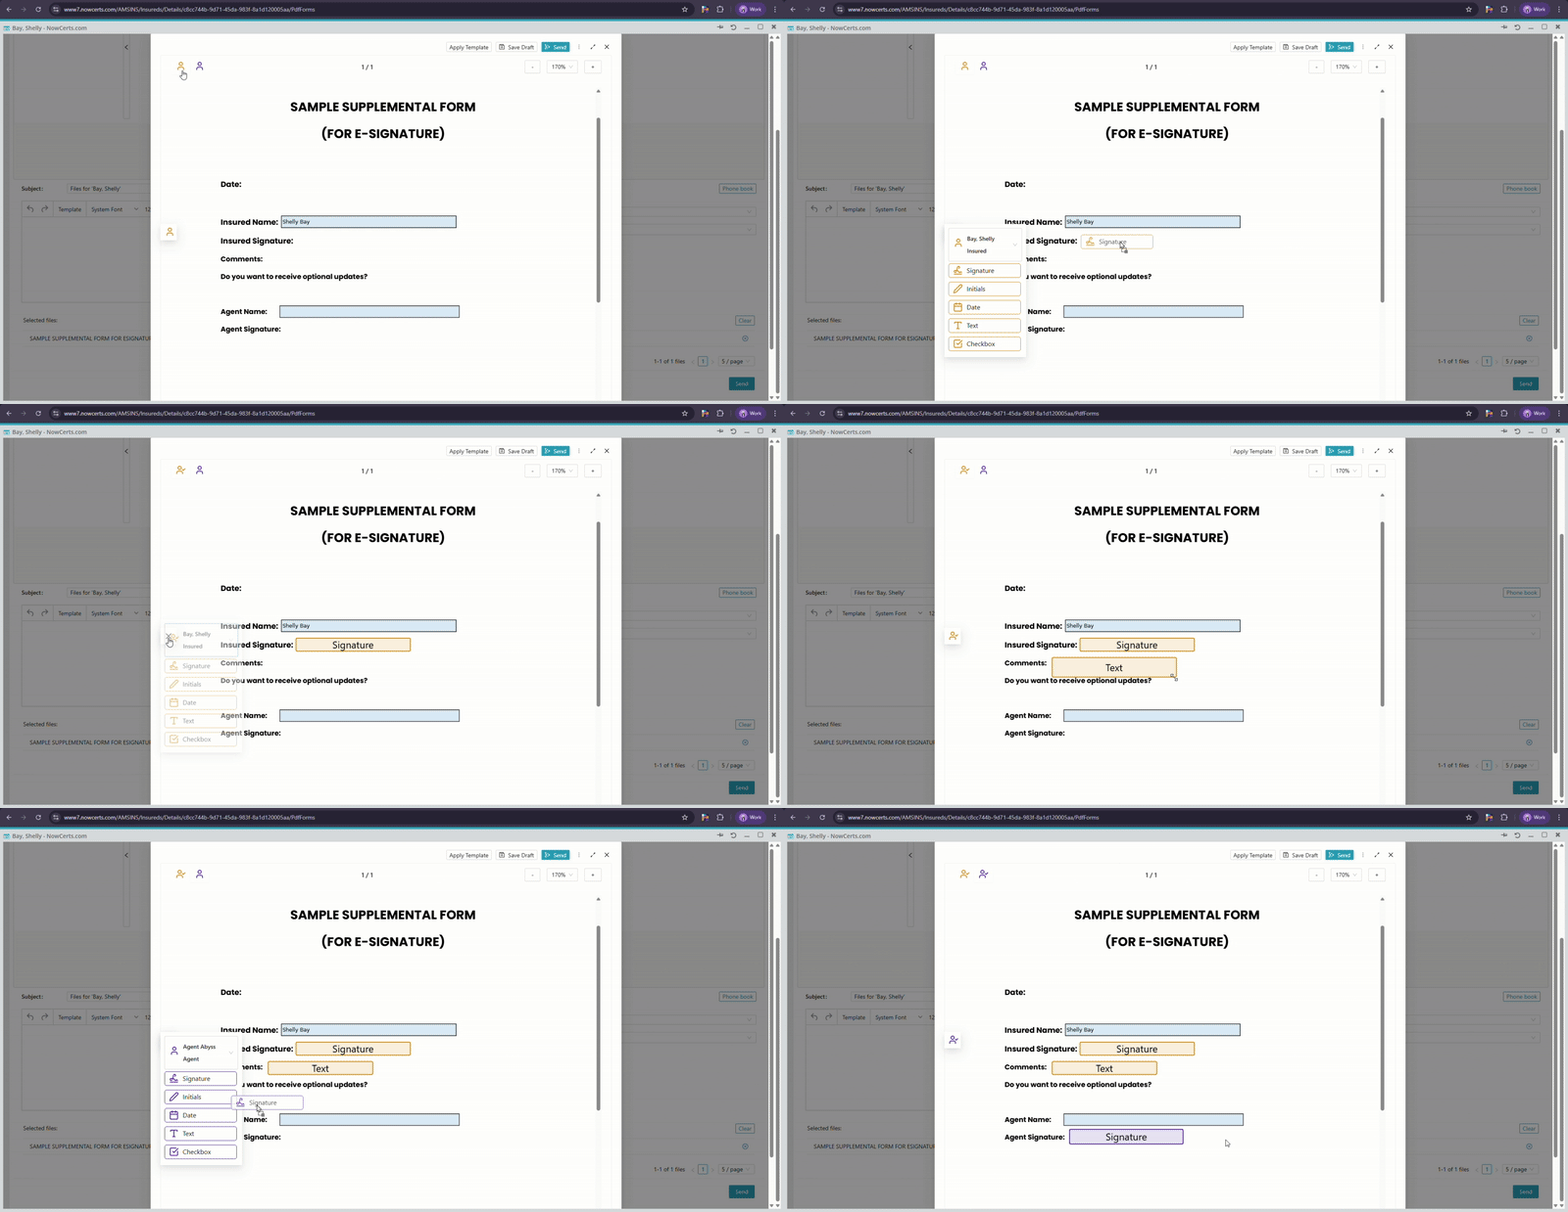
After clicking Assign Fields, RabbitSign opens the document in a signature editor window.
Use your cursor to drag and drop fields such as:
Signature – for signers’ electronic signatures.
Initials – for acknowledging key pages.
Date – for automatic time-stamping.
Text Fields – for additional required information (e.g., printed name or title).

Assign each field to the correct signer before sending.
Step 6: Send for Signature
Review your placement of signature fields.
Click Send to deliver secure signing links to each recipient.
RabbitSign sends an email invitation with a direct link to the document.
Tracking and Managing Sent Documents
Step 7: View Signature Status
Once sent, the document automatically appears under Documents → eSigned Docs.
From here, you can monitor the progress of any signature request.
Statuses include:
Created – The signature request has been sent.
Viewed – The recipient has opened the document.
Signed / Completed – All parties have signed.
Rejected – The recipient declined to sign.
Draft – The document is still being prepared for signature.

Step 8: Manage and Take Action
Within the eSigned Docs view, you can:
Download the completed, signed PDF.
Send Reminder to recipients who haven’t signed yet.
Delete or cancel a signature request, if needed.
View Participants and signature timestamps.
RabbitSign documents are grouped in their own section at the bottom of the Documents tab for easy tracking.
Key Notes & Best Practices
Documents should always be uploaded as PDFs before sending for signature.
Verify recipient email addresses before sending.
You can resend a signature invitation at any time from the eSigned Docs section.
Completed documents remain permanently attached to the insured’s record.
RabbitSign supports unlimited templates and signatures for one flat monthly fee.
Example Use Case
An agent sends an ACORD 125 Commercial Application for client signature:
Upload the ACORD 125 form to the insured’s Documents tab.
Click Actions → Send.
Select Rabbit Sign, assign signature and date fields, and send.
Monitor progress in Documents → eSigned Docs → RabbitSign Documents.
Once signed, download the completed PDF or resend a reminder if needed.
Was this article helpful?
That’s Great!
Thank you for your feedback
Sorry! We couldn't be helpful
Thank you for your feedback
Feedback sent
We appreciate your effort and will try to fix the article