When a policy is financed through a Premium Finance Agreement (PFA), Momentum AMS allows you to properly record fees, taxes, and down payments while linking the remaining balance to the finance company. Generating a transaction in this workflow ensures that receivables, payables, and commissions are recorded accurately, and that customer invoices reflect the correct amounts due.
This article explains how to add the required billing items, generate the transaction, create and send an invoice for the insured’s down payment, and record the payment to keep your accounting clean and compliant.
Add Fees & Send Invoice for a Policy Momentum AMS
Audience: CSRs/Accounting handling policy fees, taxes, invoicing, and payments.
Goal: Add required fees/taxes to a policy, generate the transaction, email the customer invoice (with online payment link), and record a payment to close the receivable.
Before You Begin
- Policy: Open the insured’s policy that needs fees/taxes applied.
- Billing type: Know whether the policy is Agency Bill PIF, Agency Bill w/ Outside Financing, or Direct Bill. This guide demonstrates Agency Bill with Outside Financing.
- What you’ll add: Example items include Surplus Lines Tax, MGA Fee, and Stamping Fee with sample amounts.
- Payments: If using online payments (e.g., ePayPolicy), ensure integration is configured so your invoice email includes the pay link.
Step-by-Step Instructions
1) Open the Policy & Go to Billing
From the insured profile, open the target policy, then go to Billing → Endorsements/Fees/Taxes.

2) Open Actions & Choose Edit Endorsement / Fee
Click Actions → Edit Endorsement / Fee to add or modify fee/tax items.

3) Confirm Billing Type (if needed)
Set the billing type to Agency Bill with Outside Financing when applicable.

4) Add Fees & Taxes
Click Add Item and choose each fee/tax from Fee / Tax. Enter the amount, then add the next item.
| Item | Example Amount | Notes |
|---|---|---|
| Surplus Lines Tax | 100 | Percent-based in many states; use your jurisdiction’s rules. |
| MGA Fee | 100 | As billed by your MGA/wholesaler. |
| Stamping Fee | 1 | Varies by stamping office; may be a percentage or flat fee. |
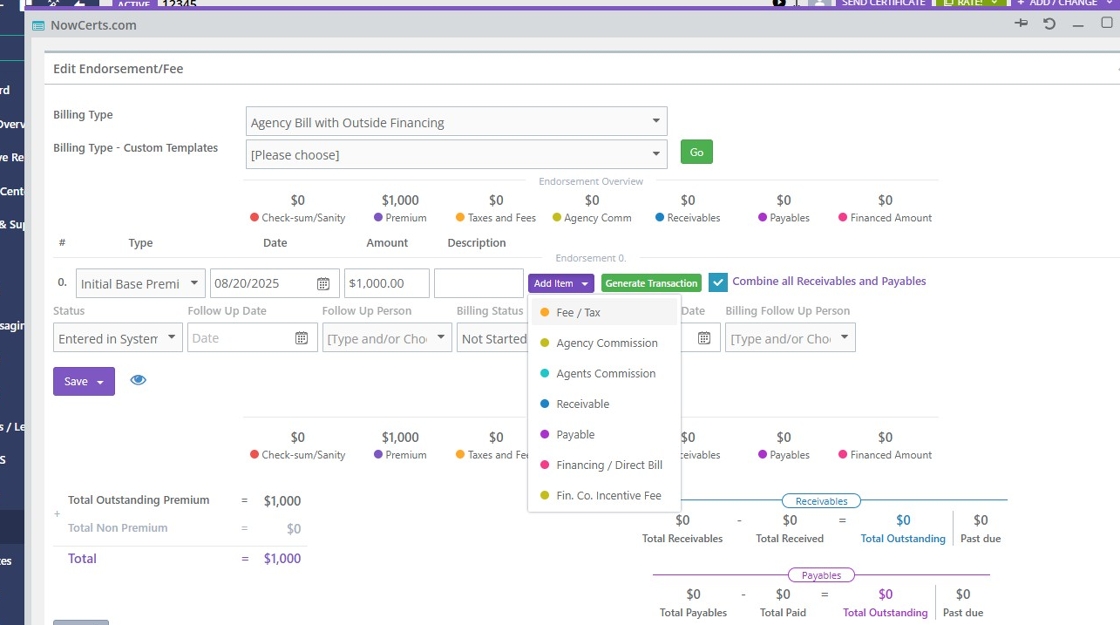
5) Generate the Transaction
When all items are added, click Generate Transaction. Review totals, then click Save.

6) Create & Send the Customer Invoice
Go to Documents → Invoices/Receipts. From Actions choose Send. Compose your email (e.g., “Here is the invoice for the policy”). If integrated, select ePayPolicy so the message includes the secure pay link. Add recipients and click Send.

7) Record a Payment (When Received)
After the customer pays, go to Documents → Issue Payments or the invoice detail and click Make Payment. Add a reference (e.g., “#12345”) and a note like “Paid via ACH”. Save.

2-Minute QA Check
- Billing type matches the financing arrangement.
- Fee/Tax items are correct for the state/market and amounts look right.
- Totals recalculate after each change and before saving.
- Invoice email sent to the correct recipient(s) with pay link (if enabled).
- Payment recorded with a clear reference and memo.
Troubleshooting
- Can’t change billing type: Remove existing items, change the billing type, then re-add items and generate the transaction again.
- Totals look off: Make sure each fee/tax type is correct (percentage vs flat) and re-click Generate Transaction before saving.
- No online pay link: Verify your payment integration is enabled for invoices and selected in the Send dialog.
- Invoice not sending: Confirm recipient address and check for blocked attachments; try sending from the invoice list’s Actions → Send.
FAQs
Q: Do I need to create the invoice manually every time?
A: If the prompt appears, Save and Create Invoice… can generate it in one step, otherwise use Documents → Invoices/Receipts.
Q: Where do I see the receivable created by the transaction?
A: In Invoices/Receipts you’ll see the outstanding amount. Accounting reports and A/R views will reflect it as well.
Screenshots show sample/training data and may include watermarks for demonstration.
Was this article helpful?
That’s Great!
Thank you for your feedback
Sorry! We couldn't be helpful
Thank you for your feedback
Feedback sent
We appreciate your effort and will try to fix the article